EasyAdvanced
Drawing a realistic car is not easy. This step by step guide can help you master this task. As a man-made machine, a car is characterized by high symmetry and straightness.
To make your result look real, you need to draw very precisely. Therefore, take enough time and look at the template carefully.
For the drawing you will need a pencil, a ruler, a dividers, an eraser, a drawing pencil and suitable colors according to your taste.
Welcome to our comprehensive car drawing tutorial, designed for both beginners and young artists! In this guide, you’ll learn how to draw a car step by step, with two different approaches: a simple version for children and a more detailed one for budding young artists. Whether you’re sketching your first vehicle or refining your skills, these techniques will help you create a car drawing that you can be proud of.
This tutorial is perfect for children ages 8 and up, as well as beginners looking to improve their drawing skills. You’ll use basic shapes like rectangles and circles to outline the car, followed by detailed steps to add features like windows and wheels. Get ready to bring your imagination to life with this engaging art project!
What You Will Need
- HB pencil for initial sketches
- 2B pencil for darker outlines
- Eraser to remove guidelines
- Colored pencils in red, blue, black, and gray for detailing
- A4 drawing paper, preferably smooth texture
- Compass or dividers for drawing circles
- Ruler for straight lines and guides

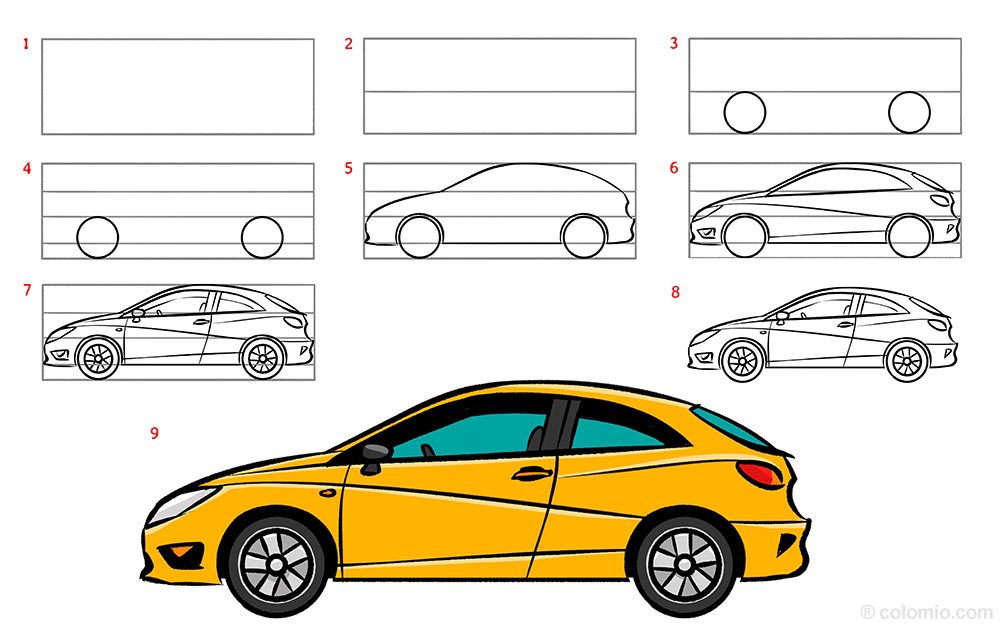
Step 1: Rectangle as border & frame
Start by sketching a narrow rectangle with an aspect ratio of about 2.5:1. This will serve as the border and frame for your car drawing. Make sure to lightly draw with your pencil so adjustments are easy. Tip: Use a ruler to keep your lines straight and even.

Step 2: Area layout
Next, draw a straight horizontal line slightly below the halfway point of your rectangle. This line divides the drawing area and helps position the car’s body. For younger artists, think of this as the road your car will drive on!

Step 3: Wheels
In the lower section of your rectangle, draw two circles for the wheels. Use a compass or dividers to ensure they are even and round. Keep a sufficient distance from the sides for proper wheel placement. Tip: Make sure the wheels are the same size for balance.

Step 4: More guides
Now, add two more horizontal guides inside your rectangle. The first guide should divide the area above the initial line into two equal parts. Use the second guide to create a similar division below the first line. These guides will help with the car’s proportions.

Step 5: Silhouette of the vehicle
Outline the silhouette of the car using the guidelines you’ve drawn. Pay close attention to the contours of the headlights and bumpers, as these details will define the car’s shape. For a more advanced look, try adding some curves to the roofline.

Step 6: First details
Begin adding details to your car, such as windows, lights, and turn signals. Make sure these shapes are clear and uniform to ensure your car looks realistic. Tip: Use light pencil strokes initially to make corrections easier.

Step 7: More subtleties
Deepen the details by drawing rims, side mirrors, and the contours of the seat and steering wheel. Take your time to add these features carefully to enhance the car’s overall appearance. For younger artists, focus on drawing simple shapes for these elements.

Step 8: Removing the guides
Carefully trace over your final drawing with a drawing pencil, emphasizing the main lines. Once satisfied, use an eraser to remove any remaining guidelines and pencil marks. This step will clean up your drawing for the final touches.
More Template Ideas


Take a picture and send it to [email protected] – we publish it on www.colomio.com!
All tutorials and images are copyrighted by happycolorz GmbH. Interested in using it? Please send a mail to [email protected].
Draw simple car: The mini street car tutorial
Step by step you will get a simple car with the following template. It’s perfect for your comic, as a doodle in between or for sketches of various kinds. Thanks to the template you will discover how easy it can be to draw a vehicle.
For the drawing we recommend a pencil, a ruler, dividers, an eraser, an eraser-proof drawing pen and suitable colors according to your taste.

Step 1: Car floor
For the simpler version, draw a straight line for the car floor, ensuring it matches the length of your planned car. This line acts as the base upon which the rest of the car will be built. Tip: Keep the line straight for a solid foundation.

Step 2: Wheels
Position the wheels by drawing a small circle intersected by the floor line, then a larger circle around it. Ensure the floor line slightly protrudes on both sides. Repeat for the rear wheel to maintain balance.

Step 3: Wheel housings
Add wheel housings by sketching arcs above each wheel. These arcs should connect smoothly to the car body and provide room for the wheels. Make sure the arcs are symmetrical for a balanced look.

Step 4: Car roof
Outline the car’s roof by drawing two straight lines above the floor line. These lines should help define the car’s height and shape. For children, make this step fun by imagining the roof as the car’s hat!

Step 5: Windows, doors, light
Begin drawing the windows, doors, and headlights, using the guides for correct proportions. Focus on clear, simple shapes to make the car look complete. Tip: Use a ruler for straight window and door lines.

Step 6: Coloring
Finish your car drawing by adding color. Choose shades that complement your design, like red for sports cars or blue for family cars. Use colored pencils to fill in the details, enhancing the car’s features and bringing your creation to life.
Take a picture and send it to [email protected] – we publish it on www.colomio.com!
All tutorials and images are copyrighted by happycolorz GmbH. Interested in using it? Please send a mail to [email protected].
More Car Templates

Your Car Drawing Is Complete!
Congratulations on completing your car drawing! You’ve learned how to sketch a car using both simple and advanced techniques. We hope you enjoyed this creative journey. If you’re ready for more, check out our other tutorials on drawing vehicles like trucks and airplanes. Keep practicing, and you’ll be an expert in no time!
Car Types: Beyond the Standard Sedan
The same drawing approach adapts to dozens of car styles with just silhouette changes:
- Sedan / saloon: Classic three-box silhouette – engine compartment, passenger cabin, trunk – all clearly separated. Toyota Camry, BMW 3 Series. The everyday family car.
- SUV / crossover: Taller, boxier body with larger ground clearance, chunky tires, often a roof rack. Range Rover, Toyota RAV4. Rugged and practical.
- Sports car: Low, sleek, aggressive silhouette with a long hood, short trunk, and dramatically swept-back windshield. Ferrari, Porsche 911. Always exciting.
- Convertible / cabrio: Same as sedan or sports car but with the roof down (or a soft fabric top folded back). Add visible interior – seats and steering wheel.
- Pickup truck: Front cabin like a regular car but with an open cargo bed at the back. Ford F-150, Toyota Tundra. American workhorse.
- Hatchback: Compact car with a single sloped rear window that lifts as part of the trunk lid. VW Golf, Honda Civic. Practical and affordable.
- Station wagon (estate): Sedan with the roofline extended all the way to the rear, creating extra cargo space. Vintage charm.
- Race car (Formula 1): Open-wheel design, sleek aerodynamic body, rear wing, exposed wheels with no fenders. Bright sponsor colors.
- Classic muscle car: Long hood, raised rear, big engine bumps on the hood, wide tires, dual exhaust pipes. Mustang, Camaro, Charger.
- Vintage convertible (1950s): Rounded curves, oversized chrome bumpers, whitewall tires, big steering wheel. Cadillac Eldorado vibes.
- Police car: Sedan or SUV in black-and-white, with a row of red/blue emergency lights on the roof, “POLICE” lettering on the side. Add motion lines for action.
- Taxi: Bright yellow sedan with a “TAXI” sign on the roof, checker pattern on the side. New York classic.
- Limousine: Extremely elongated body with multiple doors, blacked-out windows, often with a chauffeur visible. Luxury and prestige.
- Mini Cooper: Tiny boxy car with rounded edges, often with British flag colors or a contrasting roof. Iconic and cute.
- Beetle (VW): Round dome-shaped body, small wheels, distinctive curves. Vintage hippie or modern reissue.
- Cartoon car: Big eyes in the windshield, smiling grille, exaggerated proportions. Pixar Cars-style storybook character.
- Electric vehicle: Sleek modern lines, no exhaust pipe, smooth front grille (or no grille at all), aerodynamic shape. Tesla Model 3 / S. Futuristic.
Anatomy: The Details That Matter
A few small features make all the difference between a car drawing and a generic blob with wheels:
- Wheel position: Wheels should sit roughly at the front and back corners of the car, not centered. The space between the front wheel and the front bumper is small; the space between the rear wheel and the trunk is also small.
- Wheel size: Wheels should be larger than beginners usually draw – about a third of the car’s height. Tiny wheels make the car look cartoonish or proportionally wrong.
- Wheel arches: Curved cutouts in the body around each wheel. The wheel should clearly fit inside, not just sit beside the body.
- Window proportions: The windshield, side windows, and rear window form a continuous greenhouse on top of the body. The proportions are characteristic of each car type.
- The “A-pillar”: The front roof support between the windshield and the side window. Don’t forget it – without it, the windshield floats.
- Headlights and taillights: The shape of the lights signals the era and brand. Round = vintage; rectangular = 1980s; LED-thin = modern.
- Grille: The pattern on the front of the car (between the headlights). Each brand has a signature grille – BMW’s twin kidney, Audi’s single oval, Mercedes’ star, Ford’s blue oval.
- Door handles: Small horizontal slits on each door – a tiny detail that makes the car look real.
- Side mirrors: Small wing-shaped extensions on each side, mounted just below the front side window.
- Exhaust pipe: A small chrome circle at the rear bottom corner (or two, for sports cars). Not present on electric cars.
Action Poses & Scene Compositions
- Car on a winding road: Top-down or 3/4 view of a car on a curving mountain road, with cliffs and pines on either side. Adventure vibe.
- Drifting around a corner: Sports car at an extreme angle, smoke coming from the rear tires, body leaning into the turn. High drama.
- Highway with motion blur: Car in sharp focus while the background is streaked horizontally. Implies high speed.
- Car at a gas station: Nostalgic 1950s gas pump, car parked beside it, attendant figure. Vintage Americana.
- Convertible with hair flying: Driver and passengers in a convertible with hair streaming back. Pure freedom.
- Car in a garage: Tools on the wall, oil stains on the floor, hood propped open with a mechanic underneath. Detailed scene.
- Drive-in theater: Multiple cars parked in front of a giant outdoor movie screen at night. Stars overhead.
- Family road trip: Station wagon or SUV with luggage strapped to the roof, smiling family inside, scenic landscape.
- Race car on track: Aerial view of a racetrack with a car mid-corner, kicking up dust or showing tire smoke.
- Car in the rain: Wet street with reflections of headlights, raindrops streaking down the windshield. Atmospheric.
- Police chase: Police car with lights flashing pursuing another vehicle, motion blur, urban setting.
- Old barn-find car: Classic car covered in dust inside an old wooden barn, beam of sunlight illuminating it. Discovery and nostalgia.
Color Palettes for Different Cars
- Classic family red: Bright cherry-red body, chrome bumpers and trim, black tires, white-walled accents, dark gray windows.
- Sleek modern black: Glossy obsidian black body, dark tinted windows, black chrome accents, polished alloy wheels. Stealth elegance.
- Sports car yellow: Vivid lemon-yellow body, deep black accents (mirrors, grille), red brake calipers visible behind the spokes. Lamborghini vibe.
- Vintage cream: Pale cream-and-mint two-tone body, abundant chrome, wood-look interior visible through windows, whitewall tires. 1950s Americana.
- British racing green: Deep forest-green body, tan leather interior visible through the windows, spoked wire wheels. Classic Jaguar or Aston Martin.
- Storybook bright: Pure cartoon red body, bright blue windshield with smiling eyes, oversized white headlights, friendly proportions.
- Police black-and-white: Glossy black body with white doors and hood, blue and red lightbar on top, bold white “POLICE” lettering.
- Pastel mini: Soft mint or baby-blue Mini Cooper body, white roof, oversized round headlights. Instagram-perfect.
- Muscle car deep blue: Dark navy body with thick white racing stripes down the center, chrome rims, dual exhaust visible. American power.
- Rusty barn-find: Faded paint with rust patches, weathered chrome, cracked windshield, flat tires. Storytelling at its best.
Adding Realism & Movement
Tiny details that elevate any car drawing:
- Reflections in windows: Subtle light streaks on the windshield and side windows showing sky or surroundings reflected. Critical for glossy realism.
- Body highlights: A strong light streak along the upper edge of the body where the sun hits. Makes the paint look glossy.
- Cast shadow under the car: A dark area beneath the body anchors the car to the ground.
- Motion lines: Three or four short horizontal lines behind the car suggest speed.
- Smoke from exhaust: A small puff of gray smoke for a starting old car, or invisible exhaust for an electric vehicle.
- Driver silhouette visible: A simple shape behind the steering wheel through the side window. Adds life.
- License plate: A small rectangle with a number or text. Place it at the back center of the car. Tiny but realistic.
- Brake lights glowing: Bright red squares at the back when the car is braking. A small white circle for backup lights when reversing.
- Tire treads visible: If the car is on a dirt or wet surface, show tire tracks behind it. Adds context.
- Curved windshield reflection: A diagonal white streak across the windshield from upper-left to lower-right, as if the sun is reflecting. Instant gloss.
Common Mistakes to Avoid
1. Wheels too small. Tiny wheels make the car look like a toy. Wheels should reach about one-third the height of the body.
2. Wheels positioned in the middle of the car. Real wheels sit at the front and back corners, not centered. Centered wheels look unstable.
3. The windshield is vertical. Real windshields are angled backward. A vertical windshield looks like a delivery truck or a 1920s car.
4. Forgetting the wheel arches. The body should curve up around each wheel. A flat horizontal line above the wheel makes the car look like a wagon.
5. Side mirrors floating. Side mirrors should clearly attach to the body via a small stem just below the front side window.
6. The car has no shadow. A car with no shadow underneath appears to float. Even a small dark patch grounds it.
7. Headlights and taillights are the same shape. They should be different. Front lights are usually wider; rear lights are often more rectangular or slim.
8. The car proportions are too tall. Most modern cars are wider than they are tall. A car drawn taller than it is wide looks like a delivery van or SUV.
9. The grille is missing. Even a simple horizontal slit between the headlights instantly says “car.” Without it, the front looks blank.
Frequently Asked Questions About Drawing a Car
What type of paper is best for car drawing?
A smooth-textured A4 drawing paper is ideal as it allows for clean lines and easy erasing.
How do I make my car drawing look realistic?
Pay attention to proportions and details like the headlights, windows, and contours. Use guidelines to help maintain symmetry.
Can I use markers instead of colored pencils?
Yes, markers can be used for vibrant colors, but be cautious as they are less forgiving than pencils for corrections.
Why are guidelines important?
Guidelines help maintain the correct proportions and symmetry, making it easier to position different parts of the car accurately.
How can I draw different types of cars?
Experiment with different shapes and sizes for the car body and wheels. Look at photos of various cars for inspiration and practice sketching them.
More ideas for drawing
-

Airplane drawing -

Plane drawing easy -

Apple drawing -

Bicycle drawing -

Ship drawing -

Car drawing -

Car drawing easy -

Cat drawing -

Cow drawing -

Dinosaur drawing -

Dog drawing -

Puppy drawing -

Dragon drawing -

Digger drawing -

Fairy drawing -

Giraffe drawing -

Lion drawing -

Mermaid drawing -

Moon drawing -

Motorcycle drawing -

Penguin drawing -

Pig zeichnen (einfach) -

Princess drawing -

Reindeer drawing -

Rooster drawing -

Santa Claus drawing -

Shark drawing -

Sheep drawing -

Strawberry drawing -

Sunflower drawing -

Tiger drawing -

Tractor drawing -

Train drawing -

Tree drawing -

Tree drawing easy -

Tulip drawing -

Turtle drawing -

Unicorn drawing -

Unicorn drawing easy -

Witch drawing
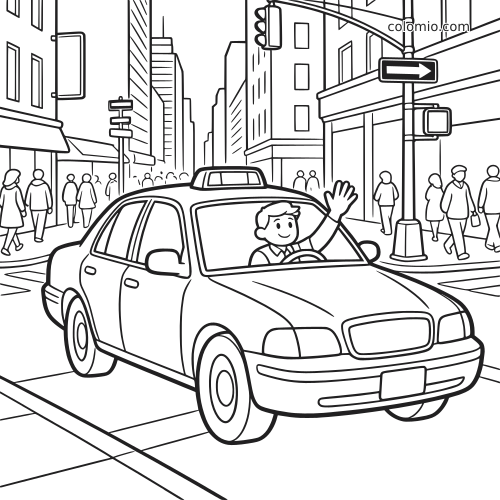
Print our free printable car coloring pages — ready-to-print line art, no signup.


