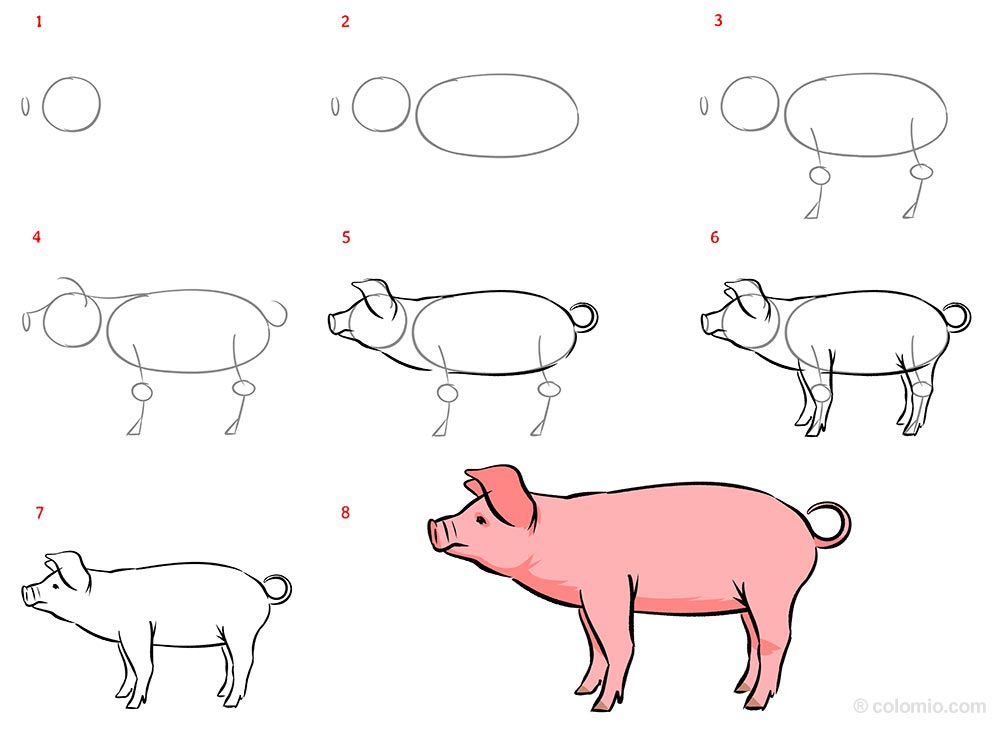
Drawing a pig is not difficult, but a few simple tricks can help make it look extra realistic and lifelike. With this step-by-step tutorial, you can draw a great pig and have a great template for a farm or fun menu design.
For this drawing you will need a pencil, an eraser, a drawing pencil and good Crayons.

Step 1: Head and trunk
First, use the pencil to draw a circle for the head and a small oval that will later become the nose. The circle does not have to be exactly round and can simply be drawn freehand.

Step 2: Hull
Using an elongated oval, sketch the body of the pig.

Step 3: Limbs
Now paint the legs. Make sure that the posture is natural. Use small circles to represent the joints. Also sketch the hooves of the animal.

Step 4: Ears, neck and tail
Draw the pig’s neck, ears and tail with the pencil.

Step 5: First final contours
From now on, use a drawing pencil. Draw the head and the body first. Finish the ears and the curly tail.

Step 6: Legs and claws
Complete the legs and ears with the drawing pencil. Note the characteristic feet of the pig.

Step 7: Eyes and face
Complete the face with eyes and skin folds around the mouth. Now carefully erase the underlying pencil drawing and all guide lines.

Step 8: Coloring
In the last step you can color your pig. If you like, you can also work with hatching to create a three-dimensional effect through the shadow and make the pig look even more realistic.
More Template Ideas
Take a picture and send it to show@colomio.com – we publish it on www.colomio.com!
All tutorials and images are copyrighted by happycolorz GmbH. Interested in using it? Please send a mail to info@colomio.com.
More ideas for drawing
-

Airplane drawing -

Plane drawing easy -

Apple drawing -

Bicycle drawing -

Ship drawing -

Car drawing -

Car drawing easy -

Cat drawing -

Cow drawing -

Dinosaur drawing -

Dog drawing -

Puppy drawing -

Dragon drawing -

Digger drawing -

Fairy drawing -

Giraffe drawing -

Lion drawing -

Mermaid drawing -

Moon drawing -

Motorcyle drawing -

Penguin drawing -

Pig zeichnen (einfach) -

Princess drawing -

Reindeer drawing -

Rooster drawing -

Santa Claus drawing -

Shark drawing -

Sheep drawing -

Strawberry drawing -

Sunflower drawing -

Tiger drawing -

Tractor drawing -

Train drawing -

Tree drawing -

Tree drawing easy -

Tulip drawing -

Turtle drawing -

Unicorn drawing -

Unicorn drawing easy -

Witch drawing


