
| Free Download | ||||
|---|---|---|---|---|
 |
||||
|
|
|
Image file | ||
A tractor, as a man-made machine, is characterized by high symmetry and straightness. Therefore, a realistic drawing without a template is very difficult. With this step by step guide you can draw a realistic tractor in eight steps.
⚠️ For this drawing you will need a pencil, a ruler, a dividers, an eraser, a drawing pencil and good crayons to your taste. Important: overall, you need to draw very precisely so that the tractor looks as real as possible. Take enough time for this.
Welcome to our exciting tutorial on how to draw a tractor in just eight simple steps! This guide is designed especially for children and beginners who are eager to explore the world of drawing. By following our clear instructions, you’ll learn how to create a charming tractor using basic shapes and guidelines.
This tutorial is perfect for young artists, typically ages 9 and up, who are just starting their artistic journey. We focus on fundamental drawing techniques like using guide lines and adding details progressively. With a little patience and practice, you’ll be able to bring your tractor to life!
What You Will Need
- Drawing paper (A4 size recommended)
- HB pencil for sketching guidelines
- 2B pencil for drawing permanent contours
- Eraser for removing guidelines
- Colored pencils (green, blue, black, yellow, and red)
- Compass or dividers for drawing circles

Step 1: Guidelines for the proportions
First, you need guide lines to ensure the proportions of the tractor are correct. Begin by dividing your rectangular drawing sheet into three equal thirds. Use a thin HB pencil to draw these straight guide lines across your paper. This will help you maintain balance and symmetry throughout your drawing.
Tip: Use a ruler to make sure your lines are straight and evenly spaced.

Step 2: The wheels
Next, it’s time to draw the wheels, which are essential for your tractor’s look. Use a compass or dividers to draw a wheel at the front and back end of the sheet. The large rear wheel should extend two-thirds of the image’s height, while the front wheel should extend one-third.
Adjust the compass to draw parallel circles inside each wheel to represent the tires and rims, ensuring the circles are concentric.

Step 3: Guide lines for the driver’s cab
Now, let’s focus on the driver’s cab. Draw two more guide lines with your pencil to mark its position. These lines should be placed one-third behind the center of the rear wheel and centered between both wheel centers. Extend these lines across the upper two-thirds of the image.
Tip: Double-check your measurements to ensure the cab is proportionate to the rest of the tractor.

Step 4: Permanent contours for hood and cabin
Switch to a 2B pencil for this step, as it’s time to draw the permanent contours of the hood and cabin. Use the guide lines you’ve created to carefully outline the tractor, paying attention to keeping your lines straight and precise.
Take your time with this step, as it’s the foundation of your tractor’s structure.

Step 5: Exhaust and wheel housing
Now, it’s time to add some character to your tractor by including the exhaust pipes and fenders. These details are crucial for giving your tractor a realistic look. Position the exhaust pipes on top of the hood and sketch the fenders around the wheels.
Tip: Keep your lines clean and sharp to enhance the tractor’s features.

Step 6: Doors, windows, tire treads, turn signals and other details
With the basic structure in place, let’s move on to the finer details. Draw the doors and windows of the cab, making sure they align with the previous guidelines. Add the tire treads, lights, vents, and other small elements to complete the tractor’s appearance.
Ensure symmetry and straight lines throughout the details for a polished look.

Step 7: Removing the guides
Before we move to the final step, carefully erase all guide lines and preliminary sketches with your eraser. This will make your drawing look cleaner and more professional.
Tip: Gently brush away the eraser shavings to avoid smudging your drawing.

Step 8: Coloring
Now for the fun part – coloring your tractor! Use colored pencils to fill in the different parts of the tractor. Consider using green for the body, black for the tires, and yellow or red for accents like lights and trim.
Experiment with shading and color gradations to add depth and create a three-dimensional effect. Enjoy bringing your tractor to life with vibrant colors!
More Template Ideas


Your Tractor Drawing Is Complete!
Congratulations on completing your tractor drawing! We hope you enjoyed the process and learned valuable drawing techniques along the way. Now, you can proudly display your masterpiece or gift it to someone special.
If you loved this tutorial, be sure to check out our other drawing guides, such as ‘How to Draw a Car’ or ‘How to Draw a Farm Scene’. Keep practicing, and soon you’ll be a master artist!
Tips for an Even Better Tractor Drawing
The single most distinctive feature of a tractor is the dramatic size difference between the front and rear wheels. The rear wheels are huge – often more than twice the diameter of the front wheels – and they have heavy, deep treads for plowing through mud. Get this proportion right and you’re instantly drawing a tractor and not a car.
Sketch both rear wheels as large circles first, then the smaller front wheels. The rear wheels should be roughly as tall as the engine hood. The treads on the rear are V-shaped or chevron-pattern, angled outward toward the edges – never simple straight lines like on a car tire. The front wheels usually have shallower, simpler treads.
The engine hood is a long horizontal block at the front of the tractor, often slightly tapered toward the front end. From it rises the iconic vertical exhaust pipe – a tall, slim chimney with a small hinged flap on top. The exhaust pipe should be tall, almost reaching the height of the cabin or higher, and is one of the most signature tractor details.
The cabin (or driver’s seat) sits between the rear wheels. Modern tractors have a fully enclosed glass cabin; older models have just an open seat with a steering wheel. The seat is high, almost like a perch, with the driver clearly visible above the wheels.
The headlights are usually two round lights on the front of the hood, with a smaller pair sometimes added at the top. A flashing orange warning light on the cabin roof is standard for road use.
Tractor Brand Variations
The same tractor template can become a recognizable brand with just color and small details:
- John Deere (American classic): Bright forest-green body, bright yellow wheel rims, yellow seat, classic “leaping deer” logo on the hood. The most iconic farm tractor.
- Massey Ferguson: Bright red body, white roof on the cabin, silver-grey wheel rims. The classic British farm tractor.
- Case IH (American): Bright orange-red body with black accents and silver lettering. Aggressive modern look.
- New Holland: Bright yellow body, blue stripes, black tires. Distinctive Italian-American style.
- Fendt (German): Vibrant green with white accents, narrower modern silhouette, rounded cabin design.
- Antique tractor: Faded red or grey body, exposed engine parts, no cabin (just open seat), spoked metal front wheels. Vintage farm museum look.
- Compact / mini tractor: Smaller proportions, often used for landscaping. Same shape but cuter and friendlier.
- Kid’s ride-on tractor: Round cartoon proportions, primary colors, oversized smile on the front. Storybook style.
- Lego-style tractor: Blocky shapes with visible studs, chunky wheels, clear simple colors. Toy-toy fun.
Attachments & Tools
A tractor by itself is fine, but it really comes alive when it’s using one of its many attachments:
- Plow: A row of curved metal blades dragged behind the tractor, turning the soil over into neat brown furrows.
- Hay rake / tedder: A wide multi-pronged tool spreading or gathering hay, often with rotating wheels and yellow tines.
- Trailer with hay bales: A flatbed trailer towed behind, stacked with golden round or rectangular hay bales. Add a few smaller bales falling off for character.
- Front loader (with bucket): Two hydraulic arms reaching forward from the tractor, with a metal scoop at the end. Lifts dirt, manure, or rocks.
- Mower deck: A wide horizontal cutter underneath the tractor – used for cutting grass on big fields or estates.
- Seed drill: A long wide bar with seed tubes pulled behind the tractor, planting evenly spaced rows.
- Snow plow: A large angled blade attached to the front, pushing snow to one side. Adds winter setting.
- Wagon with kids: A small open wagon trailing behind with happy children waving. Hayride / fall festival vibe.
Farm Scenes & Compositions
- Plowing the field: Tractor in the middle of a field, deep brown furrows behind it, blue sky with white clouds. Birds following looking for worms.
- Harvest sunset: Tractor with trailer full of pumpkins or hay bales, golden orange sky behind, long shadows on the ground. Pure autumn magic.
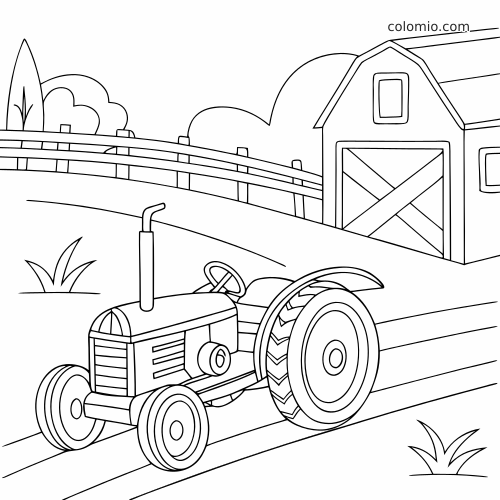
- By the barn: Tractor parked beside a red wooden barn, hay bales stacked nearby, rooster on a fence post.
- Cornfield drive: Tractor moving along a path between tall green cornstalks, perspective lines drawing the eye into the distance.
- Snow plowing: Tractor with snow plow attachment clearing a country lane, snow piled on either side, frosted trees.
- Apple orchard: Tractor under apple trees with red fruit, baskets of harvested apples on the trailer, ladder leaning on a tree.
- Farmer kid’s scene: Cartoon tractor with a smiling kid in overalls driving, chickens running alongside, a cute dog in pursuit.
- Tractor pull competition: Tractor straining to pull a heavy weighted sled across a dirt track, dust clouds and spectator crowds in the background.
Color Palettes for Tractors
- Classic John Deere: Forest green body, school-bus yellow wheel rims and seat, black tires with grey treads, white “Nothing Runs Like a Deere” logo. The most universally recognized farm color.
- Vintage red: Faded barn-red body, cream-yellow wheel rims, weathered black accents, brown leather seat. Old Massey Ferguson or Farmall vibe.
- Modern blue: Royal blue body (Ford / New Holland style), silver-grey rims, black tires, white striping.
- Storybook bright: Pure cherry-red body, sunshine-yellow wheels, big blue cabin, smiling cartoon eyes on the front grille. Pure children’s book joy.
- Rusty antique: Mostly grey-blue with rust patches, exposed brass engine parts, weathered wood seat, faded paint patches. Authentic and historic.
- Steampunk fantasy: Brass and copper accents, exposed gears, a coal-fired steam stack puffing smoke. Magical alternative.
Adding Personality & Realism
Small details that lift a tractor drawing from generic to memorable:
- Smoke from the exhaust: Three or four small puffs of dark grey smoke trailing backward from the vertical pipe.
- Mud splatter on the wheels: Brown smudges across the rear tires – this tractor is working, not posing.
- The farmer driving: A smiling figure in a checkered shirt and hat, hands on the steering wheel, visible through the cabin window.
- A faithful dog: Border collie running alongside the tractor, tongue out, tail wagging.
- Mud-flap or splash guard: Behind each rear wheel, a small rubber flap. A subtle but realistic detail.
- Hitch / tow ball: A small metal connector at the very back of the tractor, ready for an attachment. Adds purpose.
- Ladder steps: Two or three small steps below the cabin door for the driver to climb up. Tiny but anchoring.
Common Mistakes to Avoid
1. The wheels are the same size. The single biggest tractor mistake. The rear wheels must be visibly bigger – ideally about double the front-wheel diameter.
2. The exhaust pipe is missing. The vertical chimney is one of the most signature tractor details. Skipping it leaves the silhouette looking like a car.
3. The treads are simple lines. Real tractor tires have deep V-shaped or chevron treads, never the parallel rib pattern of car tires.
4. The hood is too short. The engine hood should be long – almost half the body length on classic tractors. A short hood makes the tractor look like a golf cart.
5. No driver’s seat or cabin. Even an empty tractor needs a clearly visible seat or cabin between the rear wheels. Without it, the silhouette feels incomplete.
6. Front-loader hydraulics missing. If you draw a front-loader bucket, it needs at least two visible hydraulic cylinders connecting it to the tractor body. Otherwise, the bucket appears to float.
7. The hitch / attachment point is forgotten. A small metal hitch at the back makes the tractor feel ready for work, even when no trailer is attached.
Frequently Asked Questions About Drawing a Tractor
What is the best pencil grade for drawing outlines?
For drawing outlines, a 2B pencil is recommended as it provides dark lines that are easy to see and erase if needed.
Can I use markers instead of colored pencils?
Yes, you can use markers, but be careful to avoid bleeding through the paper. Markers can give a bold look to your drawing.
How can I make sure my circles are perfect?
Using a compass or dividers is the best way to draw perfect circles. This ensures your wheels are round and symmetrical.
Why is it important to erase guidelines?
Erasing guidelines helps clean up your drawing, making the final image look more professional and polished.
What should I do if I make a mistake while drawing?
If you make a mistake, gently erase it with your eraser and redraw the section. Take your time to ensure accuracy.
Take a picture and send it to show@colomio.com – we publish it on www.colomio.com!
All tutorials and images are copyrighted by happycolorz GmbH. Interested in using it? Please send a mail to info@colomio.com.
More ideas for drawing
-

Airplane drawing -

Plane drawing easy -

Apple drawing -

Bicycle drawing -

Ship drawing -

Car drawing -

Car drawing easy -

Cat drawing -

Cow drawing -

Dinosaur drawing -

Dog drawing -

Puppy drawing -

Dragon drawing -

Digger drawing -

Fairy drawing -

Giraffe drawing -

Lion drawing -

Mermaid drawing -

Moon drawing -

Motorcyle drawing -

Penguin drawing -

Pig zeichnen (einfach) -

Princess drawing -

Reindeer drawing -

Rooster drawing -

Santa Claus drawing -

Shark drawing -

Sheep drawing -

Strawberry drawing -

Sunflower drawing -

Tiger drawing -
Tractor drawing -

Train drawing -

Tree drawing -

Tree drawing easy -

Tulip drawing -

Turtle drawing -

Unicorn drawing -

Unicorn drawing easy -

Witch drawing
Print our free printable tractor coloring pages — ready-to-print line art, no signup.
More Crafting Ideas
-

Bee craft -

How to Make a Paper Boat -

How to make an envelope -

Ladybug Craft -

Origami Boat -

Butterfly Craft


