
Free Download
Today, we’ll embark on an exciting adventure to draw a mythical creature that has captured imaginations for centuries: the dragon! This tutorial is designed especially for young artists and beginners who have a fascination with fantasy worlds and want to bring their own dragon to life on paper.
We’ll use a specific technique based on simple geometric shapes, like circles and ovals, to construct the dragon’s body – a method that simplifies the drawing process and helps maintain the correct proportions throughout the artwork.
What You Will Need
- A hard pencil (HB) for initial outlines
- A soft pencil (2B) for final contours
- Colored pencils in shades of green, red, and yellow
- A good quality eraser for removing guide lines
- A sheet of drawing paper ideally A4 size
Start with the hard pencil to sketch the basic shapes that form the dragon’s body. Once you’re satisfied with the outlines, switch to the soft pencil to darken and define the dragon’s final contours. This two-step approach ensures that your drawing stays clean and precise.

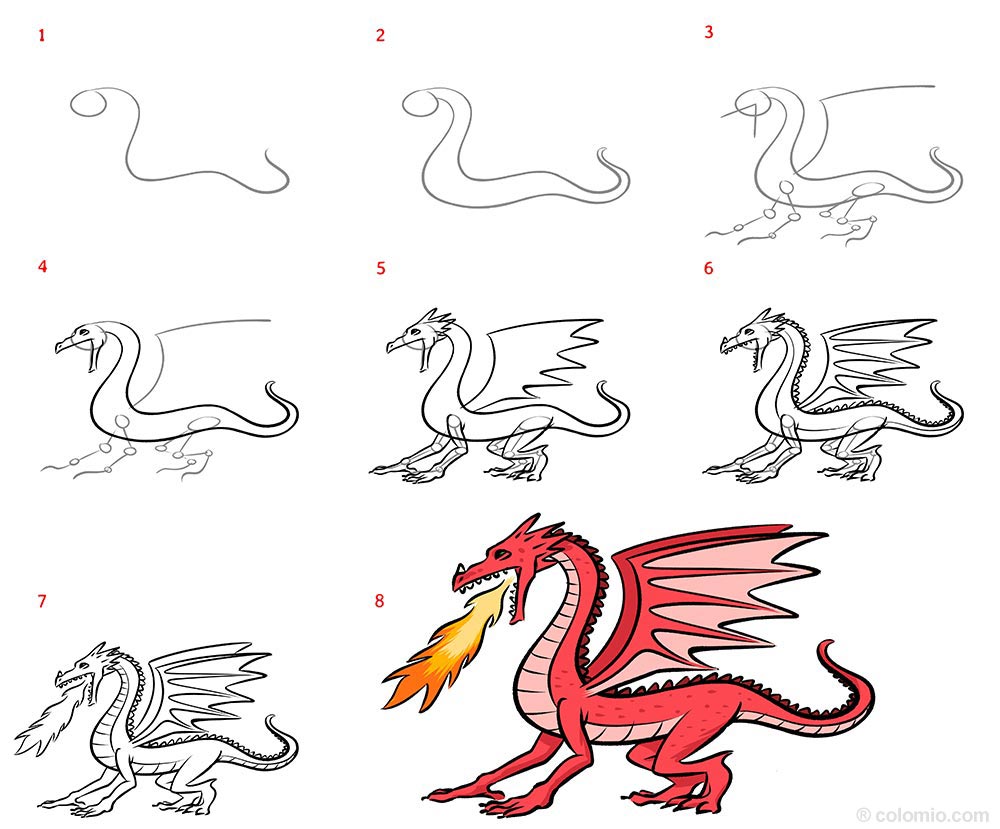
Step 1: Head, back and tail
Begin by drawing a large, elongated oval tilted diagonally for the dragon’s body. From one end, extend a curved line to form the tail. Above the body, sketch a smaller oval for the head, connecting it to the body with a gentle curve representing the neck.
These initial shapes are crucial for establishing the dragon’s dynamic pose. The tail’s curve should mimic a gentle ‘S’ shape, suggesting movement and grace. Ensure the head is slightly smaller than the body to maintain realistic proportions.
Tip: Keep your lines light and loose, allowing you to adjust the dragon’s pose easily as you progress.

Step 2: Chest and torso
Next, draw a larger oval overlapping the lower part of the head oval. This will be the chest of your dragon. Connect the chest to the body using two parallel lines on each side, forming the dragon’s torso.
The chest oval should dominate the front section, adding volume and strength to your dragon. The torso lines should curve slightly inward towards the body to give a sleek appearance, characteristic of many dragon depictions.
Important detail: The chest oval should be broader than the head, emphasizing the creature’s powerful physique.

Step 3: Snout, limbs & wings
For the dragon’s snout, extend a small, narrow triangle from the head’s front. Add four elongated ovals for each of the dragon’s limbs, two in front and two behind the torso. Above the torso, sketch two large triangles for the wings.
The snout triangle should point slightly downward, lending the dragon an aerodynamic look. The limbs should vary in size—front ones smaller than the back—to suggest a natural stance. Position the wings so they appear raised, as if ready to take flight.
Tip: Experiment with wing placement to convey different moods, such as calmness or readiness for action.

Step 4: First permanent contours
Using your soft pencil, begin defining the dragon’s permanent contours. Trace over the head, body, and tail, refining their shapes and smoothing out any awkward lines from the initial sketch.
This is where your dragon starts to take its true form. Pay attention to the flow of lines, ensuring they transition smoothly from one body part to another, enhancing the creature’s overall elegance and ferocity.
Important detail: Keep the contours bold and confident; a strong outline will make your dragon stand out.

Step 5: Final shape of the head, wings and extremities
Now, refine the dragon’s head by adding details like eyes, nostrils, and a mouth. Shape the wings with more precision, adding curves for a realistic touch. Outline the claws on each limb, giving them a sharp, menacing appearance.
The eyes should be almond-shaped, with small ovals for pupils. For the wings, ensure the outer edges are smooth and slightly curled to convey flexibility. The claws should taper sharply, hinting at the dragon’s power.
Tip: Use references of real reptiles to inspire the detailing of scales and other textures on your dragon.

Step 6: Finer points
Add finer details to the dragon’s body such as scales, ridges along the back, and texture on the wings. Use short, curved lines to suggest the texture of scales, focusing on areas like the neck and limbs.
The ridges should run from the top of the head down the spine to the tail, creating a continuous line that adds to the dragon’s majestic look. The wings can be textured using cross-hatching to imply a leathery surface.
Important detail: Adding tiny imperfections, like nicks on scales or uneven wing edges, can make your dragon look more realistic and battle-worn.

Step 7: Removing the guides
Carefully erase any remaining guide lines, being gentle to avoid disturbing your refined outlines. This cleanup step is crucial for ensuring your dragon appears neat and professional.
Focus on removing the lighter pencil marks while preserving the darker, definitive lines. This will help your dragon’s features stand out and appear more three-dimensional.
Tip: Use a kneaded eraser for more control, allowing you to erase small areas without affecting nearby details.

Step 8: Coloring
Time to bring your dragon to life with color! Start by applying a base layer of green to the dragon’s body. Use varying shades to add depth: darker greens for shadows and lighter greens for highlights.
Add red accents to the wings and tail to evoke a fiery essence, and use yellow for the eyes to create a captivating, mystical gaze. Blend the colors smoothly for a seamless transition between shades.
Important detail: Leave small white highlights on the scales and wings to mimic the reflection of light, enhancing the dragon’s three-dimensional look.
Optional Enhancements to Try
- Add a shadow beneath the dragon using a soft gray pencil to give it a grounded appearance.
- Incorporate a background with mountains or a castle to place your dragon in a fantasy setting.
- Draw additional details like fire coming from the dragon’s mouth for a dynamic effect.
- Use a white gel pen to add highlights on the dragon’s scales and eyes, enhancing its realism.
Dragon Types: Beyond the Standard Western Dragon
The same drawing approach unlocks a huge variety of dragon mythologies and styles:
- Western dragon (the classic): Four legs, two large bat-like wings, long muscular tail, horned head, scaled body, capable of breathing fire. The European fairy-tale dragon.
- Eastern / Chinese dragon: Long serpentine body without wings, four short legs with sharp claws, deer-like antlers, long whiskers, no fire-breathing. Brings rain and luck. Drawn flowing through clouds.
- Wyvern: Two legs only (the wings ARE the front limbs), like a dragon-bird hybrid. Often drawn with a barbed tail like a scorpion. Common in heraldry.
- Drake: Wingless dragon with four powerful legs. More like a giant scaled lizard. Cave-dwelling and fierce.
- Hydra: Multiple heads (usually 3, 7, or 9) growing from a single body. Each head can breathe fire or venom. Mythological terror.
- Sea dragon (Leviathan): Long serpentine body, fins instead of wings, fish-like tail, scales that shimmer. Found in deep ocean scenes.
- Hatchling / baby dragon: Small chubby body, oversized head and eyes, tiny stubby wings, soft scales. Storybook adorable.
- Skeletal / undead dragon: Bare bones with tattered wing membranes, glowing eye sockets, no flesh. Epic fantasy or Halloween.
- Crystal / ice dragon: Pale blue or white body with translucent crystal-like scales, frosty breath, icicle horns. Magical and elegant.
- Forest dragon: Green-and-brown camouflaged body with leaves and vines growing on the back, antlers like tree branches. Druidic.
- Cartoon dragon: Round friendly proportions, big innocent eyes, small puffs of smoke instead of fire, oversized smile. Pure children’s book magic.
- Steampunk dragon: Mechanical body with brass plates, gears at the joints, glowing furnace inside the chest, smoke from metal pipes. Industrial fantasy.
Dragon Anatomy: The Details That Matter
A few key features separate a believable dragon from a generic monster:
- The skull: Long muzzle, prominent eye ridges, multiple horns sweeping back from the skull. The horns should be asymmetric in length – perfectly identical horns look fake.
- The scales: Three approaches work – tiny round scales (like a chain mail), large overlapping diamond-shape plates (most common in fantasy), or a smooth leathery skin with only a few visible plates on the back. Pick one and stick with it.
- The wings: Bat-like membranes stretched between long bony fingers. The wings should be HUGE – at least as wide as the dragon’s body is long. Tiny wings look incapable of lift.
- The wing fingers: Each wing has 3–5 visible finger bones with small claws at the tips. Don’t draw smooth wings – the bones are part of the design.
- The tail: Long and muscular, often with a spike, fin, or arrow-shaped tip at the end. It should be at least as long as the body for proper balance.
- The spinal ridge: A row of triangular spikes or fins running down the spine, from the back of the head to the tail tip. Some short, some longer.
- The teeth and tongue: Visible curved fangs, especially when the mouth is open. A forked tongue adds reptilian menace.
- The claws: Each foot ends in 3–4 large curved talons. Make them prominent, not afterthoughts.
- The eyes: Reptilian slit pupils (vertical or horizontal), often with glowing colored irises. Fantasy dragons frequently have golden, red, or amber eyes.
Pose Variations: Bring the Beast to Life
A standing dragon is fine, but dragons demand drama:
- Mid-flight roar: Dragon airborne, wings fully extended, head tilted upward, mouth open in a roar with flames. The signature dragon pose.
- Fire breathing: Head extended forward, jaws wide, a stream of fire pouring outward. Add intensity with multiple flame layers (yellow center, orange middle, red edges).
- Curled around a treasure pile: Body coiled protectively around a heap of gold coins, jewels, and crowns. Eyes half-closed, alert. The classic Smaug pose.
- Perched on a cliff: Standing on a rocky outcrop with wings half-folded, surveying the landscape below. Majestic and dominating.
- Sleeping curled up: Body wrapped in a tight spiral, tail covering the snout, wings folded over like a blanket. Peaceful giant.
- Diving attack: Body pointed down at a steep angle, wings swept back, claws extended forward. Predator strike.
- Battle with a knight: Dragon and armored knight facing off, fire vs. shield, mid-action. Epic fantasy.
- Hatching from an egg: Cracked egg with the small dragon’s head and one wing peeking out. Vulnerable and cute.
- Coiled like a Chinese dragon: Long serpentine body weaving through the air in a flowing S-curve, no wings needed. Dance-like grace.
- Roaring up at the moon: Head thrown back, jaws wide, full moon visible behind. Werewolf-style howl, dragon edition.
Epic Scene Compositions
- Dragon’s lair: Cavernous cave filled with gold and treasure, the dragon coiled at the center, glowing eyes piercing the darkness. Add stalactites for depth.
- Dragon vs. castle: Dragon mid-attack on a medieval castle, towers crumbling, archers firing arrows from the walls. Maximum drama.
- Dragon and rider: Knight or warrior mounted on the dragon’s back, both flying through stormy skies. Modern fantasy classic.
- Mountain perch: Dragon silhouetted on a craggy mountain peak, sunset sky behind, distant villages glowing far below.
- Through the clouds: Dragon emerging from thick storm clouds with lightning crackling behind. Atmospheric drama.
- Egg in a nest: Cluster of dragon eggs nestled in rocky high terrain with a parent dragon watching protectively from above.
- Dragon vs. another dragon: Two dragons mid-air locked in battle, claws and wings clashing. Epic fantasy poster.
- Ancient ruins: Dragon coiled around the broken pillars of an ancient temple, ivy growing on the stones. Archaeological wonder.
- Friendly dragon and child: Small kid sitting on or beside a giant friendly dragon, both smiling. The Chronicles of Narnia / How to Train Your Dragon vibe.
- Aerial battle: Multiple dragons in mid-air combat, with motion lines, fire bursts, and dynamic angles. Cinematic.
Color Palettes for Different Dragons
- Classic red fire dragon: Deep crimson body, darker red shadows, golden-yellow underbelly, glowing orange eyes, black claws and horns. Maximum drama.
- Forest green dragon: Mossy green scales, brown undertones, amber eyes, olive wing membranes. Camouflaged and mystical.
- Ice / crystal dragon: Pale blue body with white highlights, translucent crystal accents, glowing pale-blue eyes, white horns. Ethereal beauty.
- Black void dragon: Pure matte black scales with subtle purple undertones, glowing red or yellow eyes, smoke trailing from the nostrils. Sinister and mysterious.
- Golden ancient dragon: Gleaming gold scales with darker bronze accents, ruby-red eyes, polished ivory horns. Wealthy and proud.
- Eastern Chinese dragon: Vivid red and gold body with green accents, white whiskers, deep yellow underbelly. Lucky and festive.
- Storm gray dragon: Slate-grey body, electric-blue lightning marks along the spine, charcoal wings, stormy sky behind. Atmospheric power.
- Storybook pastel: Lavender body, pink wings, sparkles, friendly eyes, tiny puffs of pink smoke. Pure children’s magic.
- Steampunk brass: Polished bronze and copper plates, glowing orange furnace inside the chest, dark gray gears at the joints, smoke trails from pipes.
Drawing Fire & Smoke
The fire breath is what truly makes a dragon a dragon:
- Layered flames: Three colors stacked – bright yellow at the core, orange in the middle, red at the edges. The white-hot center sells the heat.
- Flame shape: Tongues of fire are pointed and flickering, never round bubbles. Use S-curves and varying lengths.
- Distance fade: Flames closer to the dragon’s mouth are denser; further away they fade and break up into floating embers.
- Smoke trails: Curling gray smoke trailing from the nostrils between fire bursts. Suggests “loaded and ready.”
- Charred ground: Below or around the flame target, blackened earth or burning trees show the impact.
- Sparks and embers: Tiny orange dots floating up and around the flames. Physics in action.
- Glowing throat: A faint orange glow inside the dragon’s mouth and neck when about to breathe fire – great for build-up.
Common Mistakes to Avoid
1. The wings are too small. Dragon wings need to be massive to suggest the ability to lift such a heavy body. Tiny wings look decorative, not functional.
2. The body is too thin. Dragons are massive, muscular creatures. A thin snake-like body (unless drawing an Eastern dragon) looks weak.
3. Smooth wings without bones. Wing fingers / bones must be visible. Smooth bat-like membranes with no structure look like capes, not wings.
4. The neck is too short. Most fantasy dragons have long, snake-like necks for flexibility. A short stubby neck makes the dragon look like a dinosaur.
5. Round dot pupils. Dragons should have reptilian slit pupils. Round dots look like cartoon dogs.
6. The tail is too short. Dragon tails should be at least as long as the body for proper balance. A stubby tail looks like an afterthought.
7. Symmetric horns and spikes. Real anatomy is slightly asymmetric. Force-fitting symmetry kills the menace.
8. Forgetting the spine spikes. The row of fins or spikes along the back is iconic. Without them, the silhouette looks bare.
9. Single flat scale color. Even cartoon dragons need at least two color values for the scales – a base and a darker shadow tone.
Frequently Asked Questions About Drawing a Dragon
How do I make the dragon look like it’s flying?
Position the wings extended upwards and add curved lines to suggest motion. Drawing the legs tucked in can also create the illusion of flight.
What’s the best way to draw dragon scales?
Use small, overlapping U-shaped lines along the body. Vary the size and shape slightly to create a more natural, textured look.
How can I make my dragon’s eyes look more expressive?
Focus on the shape and size of the pupils and add small highlights within the eyes. Consider the direction of the gaze to convey mood.
How do I draw realistic dragon wings?
Observe bat wings for inspiration. Draw long, curved lines for the main structure, and add membrane details between each ‘finger’ to suggest flexibility.
What’s a good way to add depth to my dragon drawing?
Use shading techniques like hatching and cross-hatching to indicate shadows and highlights. This adds dimension and brings your dragon to life.
How can I make my dragon’s pose more dynamic?
Experiment with different poses by changing the angle of the head and the curve of the body. Dynamic poses often involve diagonal lines and asymmetry.
Your Dragon Drawing Is Complete!
Congratulations on completing your dragon drawing! You’ve successfully used the geometric shape technique to create a well-proportioned and detailed creature, mastering the art of combining simple shapes into a complex form.
Now that you’ve brought your dragon to life, why not explore other tutorials on our site? Each one offers a new challenge and an opportunity to expand your artistic skills. Keep drawing and let your imagination soar!
More Ideas For Drawing
-

Airplane drawing -

Plane drawing easy -

Apple drawing -

Bicycle drawing -

Ship drawing -

Car drawing -

Car drawing easy -

Cat drawing -

Cow drawing -

Dinosaur drawing -

Dog drawing -

Puppy drawing -
Dragon drawing -

Digger drawing -

Fairy drawing -

Giraffe drawing -

Lion drawing -

Mermaid drawing -

Moon drawing -

Motorcycle drawing -

Penguin drawing -

Pig zeichnen (einfach) -

Princess drawing -

Reindeer drawing -

Rooster drawing -

Santa Claus drawing -

Shark drawing -

Sheep drawing -

Strawberry drawing -

Sunflower drawing -

Tiger drawing -

Tractor drawing -

Train drawing -

Tree drawing -

Tree drawing easy -

Tulip drawing -

Turtle drawing -

Unicorn drawing -

Unicorn drawing easy -

Witch drawing
Print our free printable dragon coloring pages — ready-to-print line art, no signup.


