

|
||||
|---|---|---|---|---|
| Free Download | ||||
|
|
|
Image file | ||
With this tutorial you will draw a proud rooster step by step.
For this drawing, you will need a hard pencil that is easy to erase, for example HB or H2, as well as an eraser-proof drawing pencil in a dark color and colored pencils.
Welcome to our fun and engaging drawing tutorial on how to draw a rooster in six easy steps! Designed specifically for children and beginners, this lesson will guide you through the basics of sketching and coloring a vibrant rooster. With simple shapes and clear instructions, you’ll be surprised at how quickly you can create your own masterpiece.
This tutorial is perfect for those aged 6 and up, offering an easy-to-follow approach using basic drawing techniques. By the end of this guide, you’ll have learned how to use simple shapes to build complex figures and add colorful details to bring your rooster to life!
What You Will Need
- HB pencil for sketching
- 2B pencil for outlining
- Eraser to remove guidelines
- Set of colored pencils (red, yellow, brown, and any other preferred colors)
- A4 drawing paper or sketchpad

Step 1: Head and torso
Begin by drawing an oval shape for the rooster’s head in the upper right corner of your paper. Then, draw a larger, slanted oval beneath it for the body, making sure to leave a small gap between the two. This will form the basic structure of your rooster.
Tip: Use light strokes to make it easier to erase any mistakes.

Step 2: comb, neck and tail feathers
Next, connect the head and body ovals with a curved line to form the neck and chest. Draw a series of gentle curves on top of the head for the comb. Then, sketch a flowing line from the back of the body to indicate the tail feathers.
Tip: Keep your lines loose to capture the rooster’s feathery texture.

Step 3: Legs, beak and eyes
Add a small triangle on the head for the beak and a circle or oval for the eye. Sketch out the rough outline of the comb with simple strokes. For the tail, draw elongated shapes to suggest feathers. Finally, add two straight lines for each leg, and draw simple shapes for the feet.
Tip: If you prefer drawing a hen, keep the tail feathers shorter.

Step 4: Final contours
Now refine your drawing by tracing over the important lines to create the final contours. Add details to the face, such as the jagged edges of the comb and the dangling wattles. Enhance the shape and volume of the tail feathers, and draw the wing along the body.
Tip: Use a 2B pencil for darker outlines.

Step 5: Remove guides
Carefully erase any remaining guidelines to clean up your drawing. This will leave you with a clear outline of your rooster. Use your pencil to add a ruff of feathers around the neck area for added detail.
Tip: Make sure all your outlines are neat before moving on to coloring.

Step 6: Colorize
Finally, bring your rooster to life with color. Use red for the comb and wattles, yellow for the beak and feet, and various shades of brown for the body. Feel free to get creative and add vibrant colors to the feathers to make your rooster unique!
Tip: Blend colors gently for a more natural look.
More Template Ideas


Your Rooster Drawing Is Complete!
Congratulations on completing your rooster drawing! We hope you enjoyed this process and are proud of your colorful creation. Keep practicing and you’ll continue to improve your drawing skills.
If you enjoyed this tutorial, be sure to check out our other drawing guides, such as how to draw a chicken or a duck, to expand your skills even further. Happy drawing!
Tips for an Even Better Rooster Drawing
The three things that make a rooster look like a rooster – and not like any other bird – are the comb, the wattle under the beak, and the long, arching tail feathers. Spend a little extra time on these three areas and the whole drawing instantly looks more believable.
For the comb, draw three or four soft “mountain peaks” on top of the head rather than a flat zig-zag. The peaks should get slightly smaller toward the back, never identical in size. The wattle is just two rounded teardrops hanging under the beak – keep them short and a bit asymmetric so they don’t look glued on.
The tail is where most beginners give up too early. Draw the longest curving feather first (it should reach almost as high as the head), then layer 4–6 shorter feathers in front of and behind it. Each feather has a slight S-curve, never a straight line.
Color Variations: Find Your Rooster Style
Not every rooster has to be the classic red-white-black farm rooster. Try one of these color schemes for a more individual result:
- Classic Farmyard: Red comb and wattle, copper-orange body, black-green tail feathers, yellow legs.
- Sunrise Rooster: Bright red comb, golden-yellow chest, dark brown back, tail feathers in deep blue with white tips.
- Storybook Rooster: Soft pastel colors throughout – pink comb, peach body, light blue tail – perfect for nursery art.
- Black Rooster: Almost entirely black body with iridescent green and purple highlights in the tail and a vivid red comb. A great way to practice glossy feather shading.
If you’re drawing with younger children, stick to three to four colors maximum. Too many shades dilute the impact of the comb and tail, which are the parts that should pop.
Rooster vs. Hen – How to Tell the Difference
If you ever want to add a hen next to your rooster (a great follow-up exercise), keep these four differences in mind:
- Comb size: Roosters have tall, prominent combs; hens have small, compact ones.
- Tail shape: Roosters carry long, arched tail feathers (called sickle feathers). Hen tails are short and held lower.
- Posture: Roosters stand tall with chest puffed out; hens have a more horizontal, hunched silhouette.
- Color: Roosters are usually more colorful and patterned, especially around the neck and tail. Hens tend to be plainer.
This makes a great mini-lesson for kids while drawing – nature observation hidden inside an art tutorial.
Common Mistakes to Avoid
1. The comb is too flat. A common beginner result is a comb that looks like a saw blade glued to the top of the head. Use rounded peaks of different heights, and let the comb start a little behind the eye, not directly above it.
2. The body is too round. A rooster’s body is more egg-shaped than circular, with the wider end toward the front. Tilt the egg slightly upward at the chest and you immediately get that proud, alert posture.
3. Legs in the wrong place. The legs should sit roughly under the middle of the body, not at the back end. If you place them too far back, your rooster looks like it’s about to topple over.
4. Symmetric tail feathers. Real tail feathers vary in length and curve direction. If all your feathers look the same, the tail will read as fake. Vary heights and let one or two feathers cross over each other for natural depth.
5. Forgetting the eye highlight. A small white dot inside the dark eye instantly brings the rooster to life. Without it, even a perfectly drawn rooster looks lifeless.
Frequently Asked Questions About Drawing a Rooster
What kind of paper should I use?
We recommend using A4 drawing paper or a sketchpad for the best results.
Can I use different colors?
Absolutely! Feel free to use any colors you like to make your rooster unique.
How can I make sure my drawing is proportional?
Using light guidelines and referring back to the shapes can help maintain correct proportions.
What if I make a mistake?
Don’t worry! Use an eraser to gently remove any unwanted lines and try again.
Is this tutorial suitable for beginners?
Yes, this tutorial is designed for beginners and children ages 9 and up.
Take a picture and send it to show@colomio.com – we publish it on www.colomio.com!
All tutorials and images are copyrighted by happycolorz GmbH. Interested in using it? Please send a mail to info@colomio.com.
More ideas for drawing
-

Airplane drawing -

Plane drawing easy -

Apple drawing -

Bicycle drawing -

Ship drawing -

Car drawing -

Car drawing easy -

Cat drawing -

Cow drawing -

Dinosaur drawing -

Dog drawing -

Puppy drawing -

Dragon drawing -

Digger drawing -

Fairy drawing -

Giraffe drawing -

Lion drawing -

Mermaid drawing -

Moon drawing -

Motorcyle drawing -

Penguin drawing -

Pig zeichnen (einfach) -

Princess drawing -

Reindeer drawing -
Rooster drawing -

Santa Claus drawing -

Shark drawing -

Sheep drawing -

Strawberry drawing -

Sunflower drawing -

Tiger drawing -

Tractor drawing -

Train drawing -

Tree drawing -

Tree drawing easy -

Tulip drawing -

Turtle drawing -

Unicorn drawing -

Unicorn drawing easy -

Witch drawing
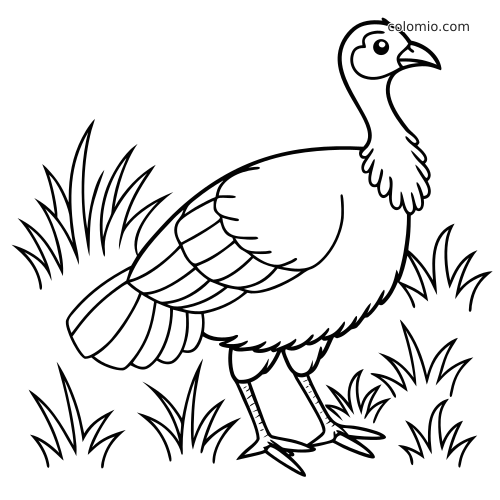
Print our free printable rooster coloring pages — ready-to-print line art, no signup.
More Crafting Ideas
-

Bee craft -

How to Make a Paper Boat -

How to make an envelope -

Ladybug Craft -

Origami Boat -

Butterfly Craft


