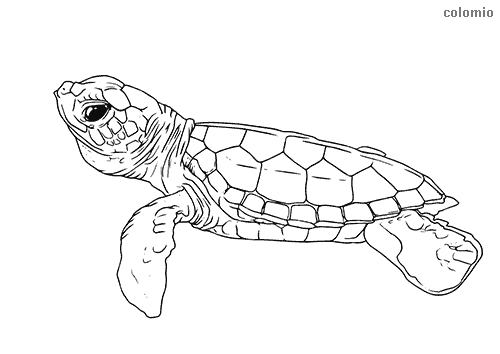
Step by step you will learn how to draw a turtle on paper according to the instructions.
In addition to this template, you will need colored pencils, a hard pencil, an eraser and an eraser-proof drawing pencil in a dark color.

Step 1: The turtle shell
You start with the tank. Draw a semicircle with the pencil. The lower part is slightly curved outward.

Step 2: The head
To the left of the shell, draw a lying egg. This is the head of the turtle.

Step 3: The limbs
You connect the head with the carapace. Then you put on the legs and tail with simple strokes. Circles mark the position of the knee joints. Your turtle is now a stick figure.

Step 4: First final contours
Use the drawing pencil to trace the permanent contours of the carapace and the head. The shell gets a wavy structure. Give the turtle a face and shape the neck. You also finish shaping the legs. The template shows you how to do this.

Step 5: The armor plates
Now we go into detail. You draw the plates in the tank and indicate with lines the folds that naturally occur when the knees are bent. Then remove the pencil lines with the eraser.

Step 6: Colorize
Your turtle gets color. You paint the body green. The shell is brown. Dark dots give body and shell more liveliness. Look carefully at the template and do the same. In the upper part of the armor plates, the brown is a little lighter. This way you simulate the reflection of light. The image will look more vivid.
More Template Ideas
Take a picture and send it to show@colomio.com – we publish it on www.colomio.com!
All tutorials and images are copyrighted by happycolorz GmbH. Interested in using it? Please send a mail to info@colomio.com.
More ideas for drawing
-

Airplane drawing -

Plane drawing easy -

Apple drawing -

Bicycle drawing -

Ship drawing -

Car drawing -

Car drawing easy -

Cat drawing -

Cow drawing -

Dinosaur drawing -

Dog drawing -

Puppy drawing -

Dragon drawing -

Digger drawing -

Fairy drawing -

Giraffe drawing -

Lion drawing -

Mermaid drawing -

Moon drawing -

Motorcyle drawing -

Penguin drawing -

Pig zeichnen (einfach) -

Princess drawing -

Reindeer drawing -

Rooster drawing -

Santa Claus drawing -

Shark drawing -

Sheep drawing -

Strawberry drawing -

Sunflower drawing -

Tiger drawing -

Tractor drawing -

Train drawing -

Tree drawing -

Tree drawing easy -

Tulip drawing -

Turtle drawing -

Unicorn drawing -

Unicorn drawing easy -

Witch drawing


